Control of Resistive Heat
(baseboard, radiant, cable, slab, cove, etc.)
A homeowner can control the electric output of radiant and baseboard heat with the use of Energy Sentry demand controller. Most resistive heating circuits are fed from a 20A, 240V breaker, with different circuits for different areas of the house. While these breakers may be labeled by location, it is very important to verify this so that they can be connected to the demand controller in the proper priority.
To verify loads, turn down all other thermostats except the one under test. Turn this thermostat up all the way. Use your Amprobe to locate the breaker that is carrying a load. The amperage may be from 5 to 16 Amps. Turn this thermostat up and down a few times, if necessary, to verify. Repeat as necessary until all electric demand loads are properly identified. Be aware that a circuit breaker may have more than one heating circuit on it, and thus have more than one thermostat on it. This is especially true of bedrooms and bathrooms.
Please note: The following steps should be performed by a licensed electrician and is not recommended for homeowners.
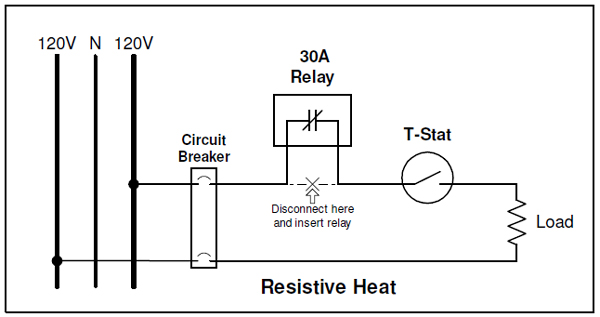
Figure 2
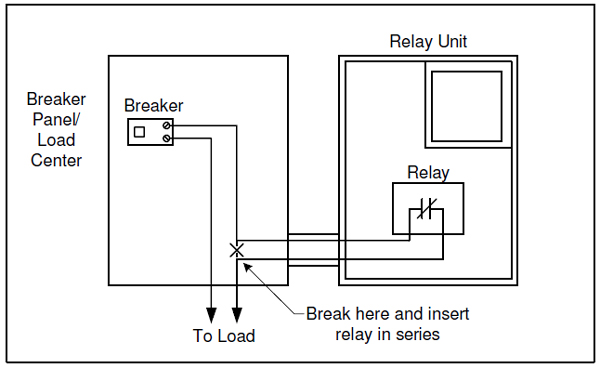
Hook-up
- Turn the heating circuit’s circuit breaker OFF.
- Disconnect one wire from the heating circuit breaker. Generally speaking it does not matter which wire.
- Extend the wire just disconnected to one side of the desired normally-closed demand controller relay, using a #12 AWG solid copper wire and appropriately-sized wire nut, as shown in the figures above.
- Add another #12 AWG wire from the now-empty breaker terminal of the breaker to the other terminal of the normally-closed relay position in step 3. Remember, if you are using double-pole relays, make sure you are wiring both wires to the same pole.
- After completing the other controller wiring, turn the circuit breaker ON.
Note
If any loads connected to the Energy Sentry demand control system are wired with aluminum wiring, insure that connections between existing aluminum conductors and copper conductors of the Energy Sentry are properly done using a Copair tool, anti-oxident paste or anti-oxident impregnated wire-nuts.
Quick Test
- Clip an Amprobe onto one of the heat circuit wires in question in the breaker panel.
- Turn up the thermostat.
- Check the amperage going to the load. It should be between 5 and 16 amps.
- Lower demand limit to minimum settng. Turn on range until all loads are shed. This may take a few minutes. When all loads connected to the Energy Sentry shed, the amperage should go to ZERO.
- Turn the thermostat Offwhile checking other circuits. Turn the thermostat to NORMAL if the tests are complete.
Control of Resistive Heat: Examples of Priority Hook-ups
| 3-Relay Models | |||
|---|---|---|---|
| Last Shed | First Shed (one of these will shed first depending on rotation) | ||
| Relay | 1 | rotate 2 | rotate 2 |
| Load A | Dryer | Water Heater | Heat |
| Load B | N/C | Heat | Heat |
| 4-Relay Models | ||||
|---|---|---|---|---|
| Last Shed | First Shed (one of these will shed first depending on rotation | |||
| Relay | 1 | 2 | rotate 3 | rotate 4 |
| Load A | Dryer | Water Heater | Bedroom Heat | Bedroom Heat |
| Load B | Living Heat | Dining Heat | Kitchen Heat | Family Heat |
| 6-Relay Models | ||||||
|---|---|---|---|---|---|---|
| Last Shed | First Shed (one of these will shed first depending on rotation) | |||||
| Relay | 1 | 2 | rotate 3 | rotate 4 | rotate 5 | rotate 6 |
| Load A | Dryer | Water Heater | Living Heat | Family Heat | Bedroom Heat | Basement Heat |
| Load B | N/C | N/C | Kitchen/Dining Heat | Den/Bath Heat | Bedroom Heat | Bedroom Heat |
8-Relay Models
Use same scheme as 6-Relay Models except with extra heating circuits. Since heat rises, try to place lowest heaters (especially on open or multi-level houses) on a higher priority level than those heaters lower in the house. Call Energy Sentry (Brayden Automation) or your local dealer for help on settng priorities.
Common Room Priorities for Heat
| High | Average | Low |
|---|---|---|
| Family Room | Kitchen | Basement |
| Living Room | Den | Bedrooms |
| Baby’s Bedroom | Bathroom | Spare Rooms |
| Dining Room | Entry |
Although different rooms have different relative levels of importance to you and your family, it is strongly recommended to set the Demand Controller Priority Level for all heat circuits to the same priority. In this way, all heat circuits can get approximately equal time. Your comfort desires should be controlled by your thermostat settng and settng the demand controller priority for all heat circuits the same priority level will accomplish this. If you desire more heat in the Family Room, for example, simply turn its thermostat up slightly higher than the others.